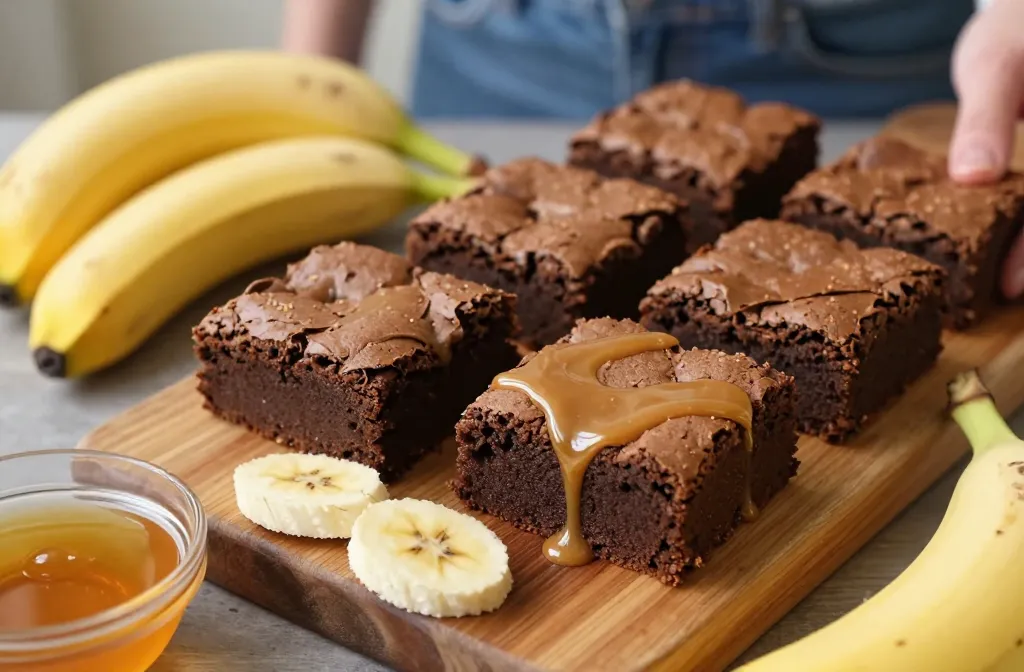
Look, I get it. You’ve got overripe bananas turning brown on your counter, and you’re trying to figure out what to do with them besides the same old banana bread. And if you’re gluten-free? The struggle is real. But here’s the thing: gluten free banana brownies with a honey-brown butter glaze might just become your new obsession. Trust me on this one.
Why These Banana Brownies Hit Different
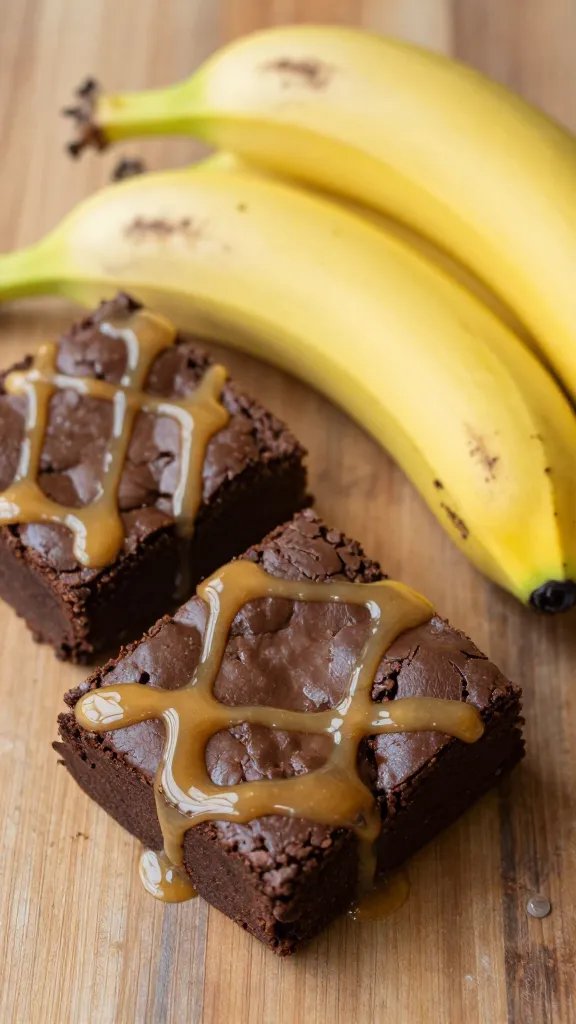
Let me paint you a picture: moist, fudgy brownies that happen to use up those sad-looking bananas you’ve been ignoring. The best part? They’re naturally gluten-free, so you don’t have to feel like you’re missing out on anything.
The secret weapon here is combining bananas with a honey-sweetened brown butter glaze. Yeah, you read that right. We’re not just slapping regular frosting on these bad boys. We’re going full gourmet without the fussy chef nonsense.
Plus, those frozen bananas you’ve been hoarding? Perfect for this recipe. They actually work better because they get super mushy and blend seamlessly into the batter. So go ahead and feel validated about your banana-freezing habits.
Gathering Your Ingredients (Nothing Fancy Required)
Before you start, let’s talk about what you’ll need. The ingredient list is pretty straightforward, and you probably have most of this stuff already.
The Main Players
For the brownies themselves, you’ll need:
- 2 cups gluten-free flour blend (your favorite mix works fine)
- 1 teaspoon baking soda
- 3/4 teaspoon salt
- 1 stick of butter (room temperature)
- 1 cup honey (or about 1.5 cups sugar if you prefer)
- 2 eggs (room temperature matters here)
- 1 cup sour cream
- 2 teaspoons vanilla extract
- 3 ripe bananas (the uglier, the better)
- 1/2 cup pecans (or walnuts, almonds, whatever floats your boat)
For That Killer Glaze
The glaze is where things get interesting:
- 1/2 cup butter (1 stick)
- 1.5 cups honey (equivalent to about 4 cups powdered sugar)
- 3-4 tablespoons cream cheese
Getting Your Prep Work Done
Here’s the deal with gluten-free baking: a little prep goes a long way. Start by preheating your oven to 375°F.
First things first, toast those pecans. Just spread them on a baking sheet and pop them in the oven. You’ll know they’re ready when your kitchen starts smelling amazing—usually about 8-10 minutes. Keep an eye on them because nobody likes burnt nuts.
While those are toasting, grab a jelly roll pan and butter it up. Then give it a light coating of gluten-free flour. Shake it around like you’re panning for gold, making sure you get all the corners and edges. This step might seem extra, but it’ll save you from the heartbreak of brownies stuck to the pan.
Mixing It All Together (AKA The Fun Part)
Time to get your hands dirty. Well, not literally—you’ve got a mixer for that.
The Dry Ingredients
In one bowl, whisk together your gluten-free flour, baking soda, and salt. That’s it. Set it aside and forget about it for a minute.
The Wet Ingredient Magic
In your mixing bowl, beat that stick of room-temperature butter until it’s light and fluffy. Add the honey and mix until combined. FYI, if you’re using sugar instead, just swap it in at this point.
Now crack in those eggs one at a time, mixing after each addition. The mixture might look a little weird and separated—don’t panic. That’s totally normal.
Add the sour cream, vanilla, and those mushy bananas. Here’s a pro tip: if your bananas were frozen, they’ll be super liquidy when thawed. That’s actually perfect because it means you don’t need the extra egg you’d normally add to gluten-free baked goods.
Bringing It All Together
Gradually fold in your dry ingredients. You’re not trying to develop gluten here (spoiler alert: there isn’t any), but you also don’t want to overmix. Just blend until everything looks uniform.
Chop up those toasted pecans—chunky or fine, your call—and fold them into the batter. Pour everything into your prepared pan and spread it out evenly. It’ll look thin, but trust the process. These babies will puff up in the oven.
Baking and the Brown Butter Glaze Situation
Pop your pan in the oven for 20-25 minutes. You’re looking for golden edges and a springy top when you gently press it. While those brownies work their magic, let’s talk about this glaze.
Making Brown Butter Like a Boss
Brown butter sounds fancy, but it’s actually dead simple. Melt a stick of butter in a saucepan over medium heat and just keep stirring. You’re waiting for the milk solids to turn a gorgeous amber color.
Watch it carefully because there’s a fine line between “perfectly browned” and “oops, I burned it.” Once it hits that golden-brown sweet spot, take it off the heat immediately.
Creating the Glaze
Whisk in about 1.5 cups of honey to your brown butter. Yeah, it’ll look separated and weird at first. Keep whisking—it’ll come together.
Now here’s the secret ingredient: cream cheese. Add it a tablespoon at a time, using the residual heat to melt it. This thickens the glaze and cuts through some of that sweetness. You’ll end up with more glaze than you need for the brownies, but IMO, that’s a feature, not a bug. Hello, ice cream topping.
The Assembly and Waiting Game
When your brownies come out of the oven, let them cool for about 15 minutes. You want them still slightly warm but not scorching hot.
Pour your glaze over the top while everything’s still a bit warm. The heat will help it soak in and create this incredible fusion of flavors. Don’t use all the glaze unless you want soup—just drizzle enough to cover the top generously.
Spread it around gently (try not to stab the brownies like a maniac), and then comes the hardest part: waiting. Let everything cool to room temperature before cutting. The glaze needs time to set up, and cutting too early will give you a messy situation.
Storage Tips That’ll Save Your Life
Once these brownies are completely cool, store them in the fridge. Gluten-free baked goods actually do better in cold storage anyway—they stay fresher longer and maintain that perfect texture.
They’ll firm up a bit in the fridge, which honestly makes them even better. Cold brownies with that slightly firm glaze? Chef’s kiss.
You can keep these refrigerated for about a week, but good luck making them last that long. In my experience, they disappear within a couple of days.
Frequently Asked Questions
Can I use regular flour instead of gluten-free?
Absolutely! If you’re not gluten-free, you can swap in regular all-purpose flour using the same measurements. You might want to add that extra egg back in though, since regular flour doesn’t need quite as much moisture as gluten-free blends.
What if I don’t have honey?
No problem. Use about 1.5 cups of regular granulated sugar for the brownies and 4 cups of powdered sugar for the glaze. The flavor profile will be slightly different, but they’ll still taste amazing.
Do the bananas really need to be that ripe?
Yes! The browner and spottier, the better. Super ripe bananas are sweeter and have more flavor. Freezing them actually speeds up the ripening process, so don’t be afraid to use those questionable-looking frozen ones.
Can I skip the nuts?
Of course. Not everyone’s a nut person, and that’s fine. The brownies will be just as delicious without them. You could also substitute chocolate chips if you’re feeling extra indulgent.
Why does my glaze look separated?
Don’t stress about it. Keep whisking and the residual heat will help it come together. Even if it stays slightly separated, once you pour it over warm brownies, everything will meld together beautifully.
How do I know when the brownies are done?
Look for golden brown edges and a top that springs back when you gently press it. A toothpick inserted in the center should come out mostly clean with maybe a few moist crumbs—but not wet batter.
Final Thoughts on These Game-Changing Brownies
Listen, I’ve tried a lot of gluten-free desserts that taste like cardboard trying to masquerade as a treat. These banana brownies are not that. They’re moist, flavorful, and that brown butter glaze takes them from “pretty good” to “I’m making these every weekend.”
The best part? You’re using up ingredients you probably already have lying around. Those bananas aren’t going to rescue themselves, and now you’ve got the perfect excuse to transform them into something spectacular.
Whether you’re gluten-free by necessity or choice, or just looking for a killer way to use up ripe bananas, this recipe deserves a spot in your regular rotation. Make a batch this weekend and thank me later.